Tampilkan postingan dengan label sailing. Tampilkan semua postingan

Sailing Model AMYA Star45 Class Construction Deck s Hatches

| 0 komentar |

from John Fisher:
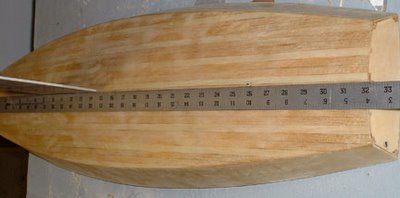
Attaching deck to hull
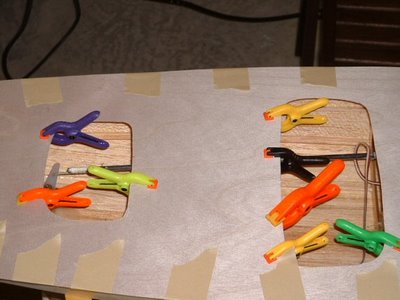
John Fisher photographer


Hull with deck mounted:
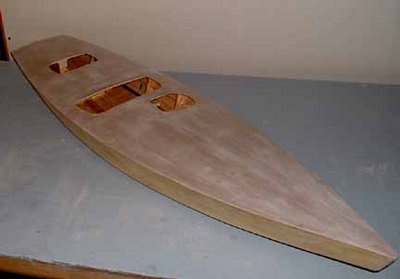
John Fisher photographer


--------------------

HATCHES:

From Phil Geren:
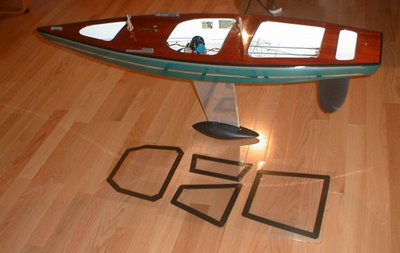
The simplest hatch cover solution I have found for Star 45 is to cut a piece out of Presentation Cover vinyl, which cut-out is shaped like the hatch opening but 1/4 or 3/8 of an inch larger on all sides. Then, apply electricians tape (1/2 or 3/4" wide) all around the perifery, so that half the tape is on the vinyl and half is hanging over the edge.

Presentation Cover vinyl which I get at Office Depot is about 15 cents a sheet; it is about 0.008" thick; it is slightly over 8.5X11" in size; a full sheet weighs about 16 grams; it is stiff, but flexible; it is crystal clear, but if you want it opaque, just wet sand it with #400 grit wet or dry sandpaper.

Position the hatch cover over the hatch so that the tape extends evenly past the hatch opening an equal distance all around, and then just press on the tape to stick it to the deck. Its waterproof, durable.

You can make spares and stick them to another piece of vinyl and carry that with you to the races. That keeps spares nice and flat and keeps the tapes sticky side clean for future use. A set of these hatch covers usually lasts me all season. At lunch, I take one cover off to allow the boat to dry out, sticking the cover to a dry vinyl sheet to keep the tapes sticky side clean.

Photo is Star 45 #778, freshly rebuilt for the Nationals this year, and a set of covers on the floor next to her.


Phil Geren photographer


--
from Uncle Dave:
I pulled one of my old Star45s from the attic and have it here in my workshop. It has a fiberglass Sirius 45 hull, a aircraft ply deck and aluminum keel fin. Unfortunately it is not one of my finest examples of workmanship or painting. However Ill suffer the embarrassment and use if to show some one style of hatch construction.

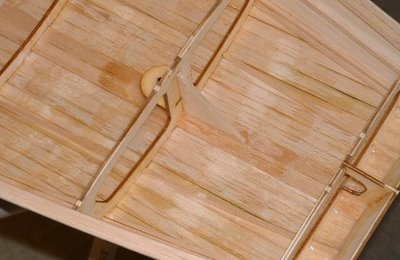
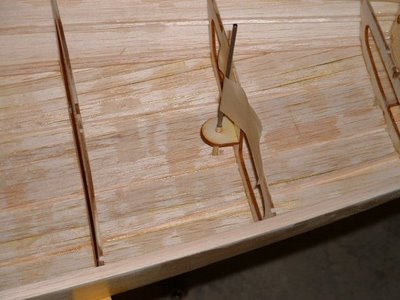
Carrying around a model around out of the water is no big deal. Taking a model out of the water can be something else. You first need to hang onto the model. Then find a place to take hold to lift the model. This is one of the reasons I have used easily removable hatches. You can grab the model through the hatch, fingers under the deck and pick it up. Of course a thin ply deck the model deck and hatch construction needs to be strong enough to withstand pulling on the deck and lifting a twelve pound plus model. Therefore I braced my decks around hatch areas.

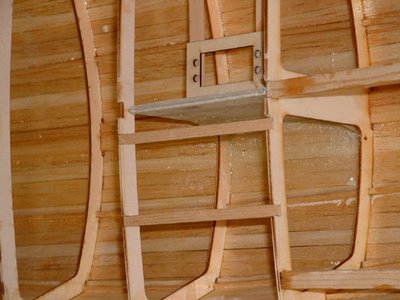
First I built a flanged frame for the hatch to sit in that also extended under the deck and attached to the deck bracing.
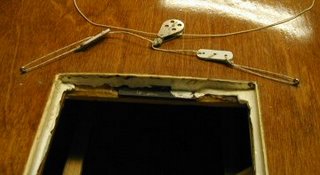
dlm_hatch_a.jpg

Then I built a hatch cover based on the size of the hatch. Initially the hatch cover was made to fit very loosely in the hatch. I then took some silicone (tub seal or similar) squeezed a bead around the shelf/lip of the hatch. The covering the hatch opening with food wrap poly sheeting Id push the hatch cover in place down into the silicone. This made a nice water tight gasket around the edge of the hatch. After waiting a day Id remove the plastic, trim and silicone that showed topside. With the silicone dry, pop the hatch cover in place and check the fit.
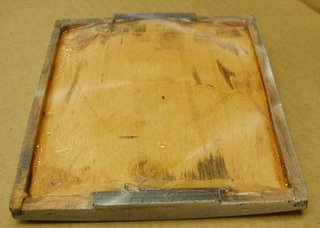
dlm_hatch_b.jpg

I placed a strip of magnetic tape on either end of the cover and on each end of the hatch frame.
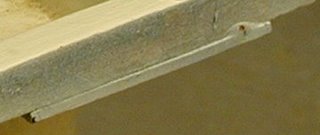
dlm_hatch_c.jpg

When the hatch cover and hatch mag tapes touched they pulled together. This magnetic tape is neat stuff you can pop the cover in place and it will stay put.

Typically I made my hatches about 4"X5" giving me plenty of deck to the sheer.
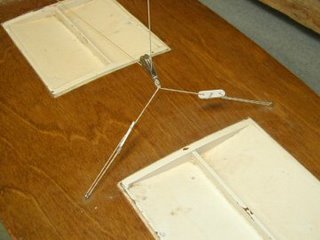
fixed_travelersml.jpg

I heavy weather if the model might go over on beams end Id cover the seams with tape just to be extra watertight. A 4X5 hatch gives room to get inside, adjust winch, radio etc, and to remove any water that got into the bilge while sailing.

Read More..

Sailing a Wooden Classic

| 0 komentar |

I was brought up in an environment where building ones own boat was part of competeing at the local Yacht Club. Im talking about the early sixties and seventies, and Im grateful to have been around for the experience. Why dont people build their own boats for competition any more?

These days it seems that dinghy racing revolves around the purchase of an off-the-shelf production boat, whether it be new or second-hand. Well, in the past there were a lot of good boats designed for ordinary people to build and race, and one of the most prominant designers was Jack Holt. Tens or even hundreds of thousands of his designs were constructed by amateurs - Mirror Dinghy, Heron, Enterprise, GP 14, 125 to name just a few.

Arguably, one of Jack Holts best designs was the Lazy E or as it is currently known, the National E. It is said that the Lazy E was designed as a successor to both the Enterprise and the GP 14, and that she had all of the virtues of the preceding designs with none of the vices.

A few months ago my middle son, David, bought an old and fairly rough Lazy E. He was hesitant at the time, being in a position where he had to be careful with his money, but decided to go ahead anyway. The old boat has proven to be a great success, and here is a short video to show what fun one can have with somebody elses cast off equipment. This shows Dave and my oldest boy, Geoffrey, enjoying a simple day-sail off Manly, Queensland, Australia. Dave on the tiller, and Geoff on the trapeze. Despite what some people say, I believe in the new generation!


Enjoy the video - you can do it as well!
Read More..

BETH Sailing Canoe

| 0 komentar |
Robert Hoffman in Poland is a 1001 Boats follower and having read his own blog I asked if we could feature his delightful Sailing Canoe "Beth".


Designed by Michael Storer


Robert tells the story as follows, "Even before 2000, my brother found on the internet an interesting and simple in construction, sailing canoe modeled on traditional sailing canoes from 1870, American sharpies and famous American boat designer Phil Bolgers influences. A boat so pleased him that soon he made contact with the Australian designer Michael Storer and bought the plans. He was going to build it, but life turned out differently. Ever since my brother showed me BETHs building plans, she liked at first sight to me also - with its elegance and simplicity, as well as the expected features of the sailing.


A few years later my brother gave me BETHs plans to build. In April 2009, build began my sailing canoe in my tiny garage. The whole time I was by Internet in contact with Michael Storer, who on his forum and private gave me some useful advices. The boat was a really inexpensive and simple to build. Building was possible singlehanded and using a very modest set of tools. After several months, just before the onset of cold weather definitive construction was interrupted for the winter, and then resumed in April 2010.


My BETH Sailing canoe was launched May 28, 2010 in Gdansk (Gorki Zachodnie), where it took part in the Raid Poland 2010. She obtained the name "YuanFen" (Chinese - a force that brings people together) but the variable and uncertain weather and the experience and common sense meant that BETH “YuanFen” did not emerge over the Gulf of Gdansk.

From June 2010 to the end of August Ihave tested it on a little lake (Jezioro Dziekanowskie) near my house. She proved a fast boat and pleasant sailing. Is the boat for the experienced sailor, but the hull is relatively more stable than the other canoe hulls. She is easy to maneuver on land it singlehanded and easy for trailering and roofracking. She draws attention to its characteristic appearance and speed - she is the attraction of the waters which she will be on.

I am grateful to the designer Michael Strorer for such a beautiful design and for his advice and comments, which I gladly gave during construction, as well as my brother, for showing me BETH and transmission plans, including the right to build her.

I have serious plans to continue to use my sailing canoe BETH "YuanFen" - I intend to test it to a larger water body, and prepare for the trip (in 2012) from the Poland to Danish island Bornholm - about 70 nm open Baltic Sea. This requires preparation and common sense - good and stable weather is essential. I believe this is possible, but always keep in mind that this is just a tiny canoe.
"


Beth has a delightful simplicity and elegance, a perfect boat for getting out and enjoying being on the water, equally as many intrepid Victorian sailors were to demonstrate these small craft can make remarkable voyages. We look forward to hearing more on Roberts open water voyage on the Baltic.
Read More..

Sailing the Eve 16

| 0 komentar |
Today I received the following comment from Dennis about my previous entry: -

I like what you are doing with the blog, Ross. Great Stuff! On another note, did you get to sail EVE? What did you think of the design? -- Dennis

Well, I didnt sail the boat personally, but both of the hulls I built were finished off by their respective owners, and both have been sailed. One of them went on to be used in the Jody Foster film, "Nims Island". As far as I know, the other one is still in the hands of the original owner.

The Eve 16 was a development that Mike Roberts carried out on his well-known Green Island 15 design. What he did was to run the Green Island 15 through his Maxsurf program and get the program to round-off the sharp edges of the straight-sided and flat bottomed Green Island 15. Mike wanted the boat to be built as a strip planked hull, and I believe that at least one was done that way by an owner-builder.

This is the first Eve 16 hull I built, showing the original sheer line, and in the process of being fitted out by the owner

Here she is heading out of the driveway on launching day

However, both of the customers I had for the Eve 16 were keen to try out my idea of having a strip planked bottom up to around the fairly hard turn of the bilge, and then change to glued lapstrake for the rest of the planking. Mike wasnt keen, but good-naturedly agreed to me doing it that way.

The results were excellent. The first boat was built as per the plan, using my planking method, but the second had a little extra hollow cut into the sheer at the request of the owner. If you look at the pictures, you can see that the sheer strake is a bit skinny in the middle, but the revised sheer line is more pleasant to the eye - the original looking a bit flat.

This is an upside-down photo I took to check the new sheer line that we were marking on the second hull to be built. You can see that there is not too much hull to be cut away, but the visual difference was amazing.

The new sheer line being displayed just before I towed the hull to the owner for the finish work. This is the boat in the sailing photos, and the one which ended up in "Nims Island"

The boat that I saw sailing went very well indeed, and seemed to sail just as well as the Green Island 15 which is not surprising given the origin of the hull, and the fact that the rigs and layout were identical.

The second boat under sail in Manly Yacht Harbour
And another view of the same boat
Now, Im worried that everybody will go off and buy plans from Mike, so here are some pictures of some of my boats - after all, it is my website and you all get the pictures for free!

A Phoenix III sailing powerfully on the west coast of U.S.A. It looks like she has a triangular mainsail, but it is just the angle of the sprit mainsail
Me sailing Periwinkle on launching day
Read More..

Sailing Model AMYA Star45 Class keel mount using keel trunk

| 0 komentar |

Here is how John Fisher built two Star45 keel trunks. First he make a aluminum mandrel that is the same size and shape of the top of his keels. Next he waxed the aluminum and then put a single layer of wax paper over the mandrel.

He used a light spray of 3M 77 to stick the ends together on the second one. The first one had a pc of tape, which is now a part of the trunk.

The mandrel with waxed paper is wrapped with glass which he again used 3M 77 to hold in place. He has not verified that this doesnt have any long term effects to the glass so use at your own risk. John used 2 layers 3.2 oz glass with glass tape on the top and bottom edges to help add some stregth. Usually he would add kevlar, but that is not allowed in the stars. One the glass was in place John wet the whole thing with resin. If you dont have any way to vac bag the trunk, just let it cure and remove the mandrel. The trunk weighted in at 1 oz.

John has a food vacuum sealer so he put a release paper over the top (wax paper with holes in it), then breather cloth (he hasused paper towels in the past), and then into a food saver bag for the night.

To remove the mandrel he used a hammer and a vice. He knows that sounds severe, but that is what it took to get the mandrel back out. He started by placing the mandrel into a vice with smooth jaws. The jaws were just far enough apart that the aluminum would fit between them, but not the fiber glass wrap. Then he tapped the mandrel out. He points out how much force it took for him to get this apart so you can design your keel top with this in mind.

Photo 01- mandrel before prep
Photo 03 -mandrel with glass, ready for resin
Photo 04-keel trunk in food saver bag. You can see the resin going into the breather cloth.
Photo 05 - keel trunk off the mandrel, note the tape. 2nd trunk used3M 77 instead.
Photo 06 - Trunk on the keel.


The following picture shows the way that John aligned the keel on his second boat.
Since the keel is plate and 1/8" thick I laid a straight edge on it and
aligned it with the pc at the center of the transom. I did this on both
sides to make sure it is centered as well.

To capture the top of the keel box he added 2 1/8" X 3/8" spruce blocks
to the top of the keel trunk and glued them to the king plank. The photo also shows the glass tape He used to reinforce the
radio tray.


John Fisher photographer


===

here is an alternative keel trunk (from Uncle Dave)

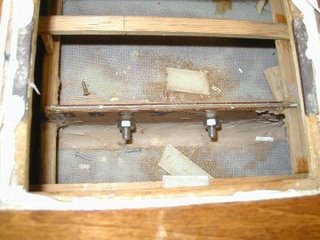
I poked my camera down into the Sirius 45 and snapped a couple of pictures showing how the keel is attached to allow it to be removed and another installed.

The keel is a aluminum fin with my flat bottomed bulb. The keel trunk is assembled over the keel fin before mounting the trunk in the hull. The trunk is pretty simple. Two pieces of 1/8 ply on either side of the fin. Cut flush across the top of the fin. Height is determined by the amount of the fin to extend into the hull. Length is determined by the shadows or braces to support the fin. A filler pieced goes between the sides so that fin can be slid own and out of the trunk.

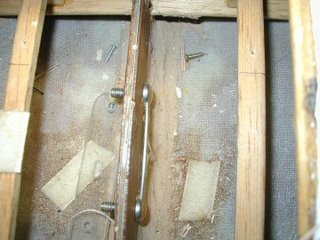
Before gluing the trunk up it is very important to coat the insides of the trunk to make the sides of the trunk as water resistant as you can. The the fun part is placing two mounting bolts through the sides of the trunk and thought the keel fin. I think the two bolts in the picture were 1/2 long 3/8 inch dia.

DLM_s45_trunk_a.jpg

I placed a heavy wire through the both the bolt heads so I could turn the nuts on the other side.

DLM_s45_trunk_b.jpg

With the nuts removed the two bolts simply push to one side and the keel fin mounted or removed as the case may be. In my models the height of the fin inside the model is low enough for a swing arm sail control to fit properly. I use Probar (now Dumas) SCUs.

Before building the deck I simply dropped the trunk (with keel fin) through the slot in the bottom of the hull so the trunk rests on the keelson. The hull being fiberglass the trunk if filleted with the bottom using some auto body resin-paste. I think I also used the resin paste to mount the keel trunk in my wooden models (memory escapes me its been years). The ends of the trunk are braced to the chine to with stand leverage forces from the heavy keel bulb and sailing stresses.

DLM_s45_trunk_d.jpg

When the two bolts are tightened they not only hold the keel in place they also pull the sides of the of the trunk tightly together. With the tight fit one should expect the keel fin may stick in the trunk if some sort of lubricant (silicone) isnt used.

Read More..

Steps toward building a sailing model

| 0 komentar |

Building Displaying Sailing
Model Boats and Ships

So you want to build a sailing model
Find plans for a sailing model, buy or find on-line.

Join a model boat forum for advice.

Buy or borrow books on boat building.

Decide on type of planking and wood to be used to build the model.

Set aside a work space for building.

Review the bill of materials need to build the model and buy the materials.

Order deck and mast fittings.

Order mast (if you are buying the mast) and order sails (or sail material).

Choose the radio system, buy a sail control unit, Order keel bulb or get advice and discuss issues of building your own.

While the hull is under construction build:

Keel fin and ballast bulb

Rudder assembly

Make or assemble spars ( mast and booms)

Build cradle to hold boat under construction and when finished.

Test Radio System and sail control unit

After hull is planked:

Install keel trunk or make provisions for mounting keel.

Install radio and sail control unit, Then remove while construction continues.

Construct deck and hatches

Install/mount deck fittings

Test access to radio and sail control inside the hull.

Provide a exit guide for radio antenna so it can be attached to mast or stays.

Install power switch for turning off batteries

Test mount keel

Paint hull, rudder and keel

Assemble hull, rudder and keel

Set up mast and boom.

Install radio controls.

Check running rigging.

Attach Sails

dry sail model

--

Sail
Display
Storage
Read More..

First Mate Sailing

| 0 komentar |
There are quite a few examples of First Mate on the water now, but except in photographs, I havent had the opportunity to see the boat sailing.

First Mate with the sprit rig option
I designed this boat for my friend, Ian Hamilton, who wanted a Phoenix III but didnt have the confidence to tackle such a building project. However, having previously built a Bolger Cartopper, he felt that a stitch-and-glue version would be within his capability.

As it turned out, Ian never did build the boat, so I came up with a deal where he would pay for materials, sails, trailer etc., and I would build the boat in my own time. This approach saved him a lot of the money normally required, and it allowed me to test the panel developments I had drawn - the most critical element in a stitch-and-glue boat design. A symbiotic process. The problem from Ians point-of-view was that once I had proved the panel developments, there was no pressure on me to finish the job!

The stage at which Ians boat lingered for a long time

Well, Ive gradually got Ians First Mate finished, and weve had three outings to carry out "Builders Trials" - Im absolutely thrilled with the results so far!

The video link below shows First Mate sailing off Manly, which is a bayside suburb on the south-eastern side of Brisbane, the State Capital of Queensland, Australia. Conditions were good, with about 15 knots of wind from the north-east, kicking up a short, steep chop. The rig on this particular boat is the 76 sq.ft. balance lug, but Ian will probably purchase the 104 sq.ft. sprit rig at a later date. Because both rigs use the same mast, in the same location, it is quite feasible to have interchangeable rigs for different styles of operation.

I was the one with the camera, and Im afraid that there was nothing I could do about the camera shake in the choppy conditions. I was in a 12ft boat which has a quick motion, and was handling the camera with one hand. I have no idea why the final scene is in soft focus....but it is still worth watching. Skipper of the boat was one of my sons, David.


Read More..

Sailing Model AMYA Star45 Class building rudder

| 0 komentar |

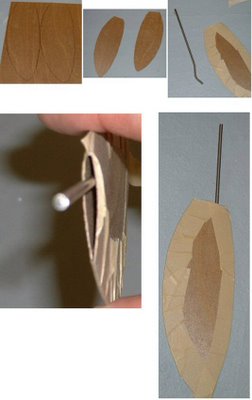
Here are some photos showing one way to build a rudder quickly and easily. The quick overview is cut out the shape in a thin material, tape the sides together, insert the rudder shaft, fill the inside of the rudder with epoxy. This takes about 10 min or so to do. Followed by installation in your boat.

John Fisher

Lay out the rudder shape on a sheet of 1/64 ply. On other class boats John used a single layer of a 6 oz carbon fiber layup, so you could also lay up some fiberglass for use on the star. To do a glass layup, just take a sheet of 6 oz or heavier fiberglass, a sheet of lexan or plexiglass, and some resin. The first step is to spread resin on the plexiglass, then apply the fiberglass and then make sure it is all wetted out. Once cure flex the plexiglass and the layup will pop off.

Shows the two sides cut out of plywood, these could be fiberglass instead. Straight sided shapes like shown and the star plans are easier to make.

Tape the two sides together with masking tape. With curved shapes He taped them together then insert the shaft and resin. If you use straight sides on the rudder you can tape one side and then open it up like a book, apply resin, then close and tape shut. The open book method uses less resin but only works with sq or straight sided shapes.

Note the bend John put in the shaft to prevent it from turning inside the rudder.

Shows the top open to pour in resin. John uses a syringe to pour in resin once the shaft is in place. You can add micro balloons to the resin if concerned about weight.


Installing Rudder in Star 45

rudder brace

rudder tube


tiller

rudder link

John Fisher photographer

Read More..

A Simple Sailing Canoe

| 0 komentar |
Like most of us I have collected a vast number of plans over the years, almost as though having the plans or offsets gives one the possibility of building the boat if required, and that having that possibility is almost as good as having the actual boat.

In 1980 I was reading, among other books, L. Francis Herreshoffs "The Compleat Cruiser" and John Leathers nice little book "Sail and Oar". In "The Compleat Cruiser" is a print of the lines of Francis Herreshoffs interpretation of what he called, a "Rob Roy" double-paddle canoe. What she is, is a half-decked kayak which is wider and shorter than a conventional kayak, and with greater freeboard than normal. She is what Phil Bolger called, "...a canoe-like boat...". Her dimensions were 14 LOA x 26" beam and with a draft of 5-1/4". I found her lines to be absolutely captivating then, and still do today. I hope that one day I may be able to work out how to draw something as beautiful....


John Leathers book re-ignited my interest in sailing canoes at about the same time, and I dreamed of having a sailing canoe with lines similar to the Herreshoff boat.

In mid 1987 (I think) I can remember the excitement I felt when I discovered the existence of Iain Oughtreds plans for the sailing canoe, MacGregor in a copy of Woodenboat Magazine (or the store catalogue). She is a 31"-wide glued-lapstrake sailing canoe which can be built with a length of either 13 7", 15 8", or 173". I believe that in subsequent editions of the plans, Iain Oughtred only recommends up to 15 8" LOA. Other options included open or half-decked configurations, and a choice of a cat-rig or a cat-ketch rig. I immediately ordered a set of plans, and finally started building 1991.


At the time of building I was living a hectic life, trying to balance full-time work as an Air Traffic Controller with the responsibilities of helping to bring up our three small sons. This did not leave much time for experimentation with the finished boat, and over the years she received only intermittent use, although she did prove to be a capable sea-boat under paddle-power, having once carried me on a 41 kilometre saltwater journey in 25 knots of wind.

I never did have the proper sail(s) made, but rigged her with the sail off a Bolger Nymph which I had built at an earlier time.

My Bolger Nymph a long time ago

The Nymph sail was of a suitable area, and I set it as a boomed lateen, and that configuration has worked very well on the canoe.

Recent photo of my MacGregor on Atkinsons Lagoon. The rig should be hoisted higher on the mast

Steering is carried out using foot-pedals attached to lines which run to the rudder yoke,  to which I also have a "push-pull" tiller attached.

A few weeks ago, my son, David, and I went for a sail on nearby Lake Wivenhoe. Dave was sailing his much modified Janette which he built for himself at age 14,  (you can read about the boat here http://rosslillistonewoodenboat.blogspot.com.au/2013/03/whimbrel-developments.html ) and I was sailing the  MacGregor. Unfortunately the wind was almost non-existent, but towards the end of the day we got enough to allow Dave to re-familiarise himself with the sailing canoe. Here are a few pictures: -


Although the water was glassy, you can still see that the boat is making some progress due to good technique and careful  sail-setting.

Despite being cooked in our Australian sun, Dave looks content!
The leeboard is ballasted with enough lead to give it neutral buoyancy, and  is held by a strong lanyard above the handle. There is a leeboard guard attached to the hull planking so that the sideways pressure from the sail pushes the board hard against the guard, which is parallel to the centreline of the boat. The leeboard is asymmetrical in section, with a flat outer face and a cambered inner face, which helps it develop lift to windward. When tacking, the leeboard is lifted, turned around so the cambered face will still face inwards, and dropped on the other side. 

A good shot of the boats trim under sail.

It is important to get crew weight to windward - even in light conditions .

Being able to use the paddle under the sail is a great advantage.

Here is a video shot by Paul Hernes when he and I were at a Wooden Boat Association meet on Lake Wivenhoe. I was sailing the canoe, and Paul was filming from his Phoenix III. When you hear him making a comment about fences, he was pointing out that we were approaching the shore, where there was an old fence from an abandoned cattle property poking up through the water! In the video you can see how fast the little boat is - despite the wind noise in the camera mike, the wind was very light at the time.

http://www.youtube.com/watch?v=eK-4NZrvcZ4

A sailing canoe is such an easy thing to build, store, and transport that I encourage everybody to have a go. You will learn a lot about sailing in a short time, and the costs are minimal.
Read More..

Golif the first all plastic sailing yacht

| 0 komentar |

The 23ft Golif was built from 1962 by the Jouët works at Sartrouville. Jouët claim she was the first production small offshore cruiser to be entirely built in GRP, and she caused a stir on her introduction at the first Paris Boatshow in January 1962.

The unusual name comes from a famously ruthless, daring, and reportedly amorous 17th century French pirate, Louis Adhémar Timothée Le Golif, also known as “Borgnefesse”. Since his nickname means something like "one-eyed-arse", you would probably have been wise to address him, at least until you got to know him well, as Captain Golif.

Golif was designed by Jouet with one eye on the American market, where the management believed they could sell a lot of boats. They had probably been helped considerably in their objective by the earlier successful transatlantic voyages of Jean Lacombe, in a plywood Jouet Cap-Horn. Apparently the companys market research suggested that the Americans favoured rather more interior comfort than the European market was used to, and that stiffness under sail and transportability by road would be important qualities for US buyers. Some of the Golifs characteristic features, such as its panoramic cabin window, shoal draft, relatively light displacement and high ballast ratio, stem directly from these market-related requirements.

Even today, Golifs looks seem rather quirky, though the underwater hull shape and the rig appear conventional. At the time, however, Golifs rig was considered rather tall and narrow, and the aluminium mast was in those days quite an innovation on a small cruising yacht. The odd pinched shape of the coach roof seems to have been intended to maximise the width of the side decks, but without sacrificing headroom in the places below where you might want to stand. Thus, with perfect French logic, there is low headroom over bunks and seats, where you sit or lie down, but there is plenty of headroom over the central passage and galley area, where you stand or walk. As the Jouët company said, this deck was designed from the inside!

Unusually for such a small boat, Golif had a decent chart table at which you could comfortably sit and work while facing the direction of travel, as you might in a much larger yacht. This was achieved by making the chart table swing down from the cabin deckhead right in the centre of the boat. Another innovation was a hinged and sliding hatch (visible in the colour photo of a Golif recently for sale in France)

Some versions of the Golif were delivered with an optional deeper keel for racing performance. These boats were excellent performers in offshore races and won many prizes, but it was a perfectly standard Golif that achieved the greatest fame for the class. In 1964, Jean Lacombe who had been Frances sole entrant in the 1960 Observer Singlehanded Transatlantic Race (OSTAR), returned to repeat the feat in a Golif, once again the smallest boat in the competition. This was the year of Eric Tabarlys first triumph, so Lacombes achievement was rather overshadowed by the acclaim and fanfares garnered by the winner. Nevertheless, Lacombes Golif took joint pride of place, alongside Tabarlys Pen Duick II at the centre of the 1965 Paris Boat show. (see photo)

There are varying estimates of the total number of Golifs built by Jouet and also by the Dubigeon yard in Normandy. The total number certainly comes to over 1000.


Jouët Golif
LOA: 6.50m
LWL: 5.92m
Beam: 2.22m
Draft: 0.96m
Displacement: 1200Kg
Ballast: 480Kg (cast iron)
Sail area: 23.2sqm

Many thanks to the French Golif owners website for all the b&w images and much of the information used in preparing this post. Colour photo of a Golif recently for sale in France from an advertisement on www.leboncoin.fr

A scanned copy of the original 1963 Jouet Golif sales brochure is available in .pdf format from Yacht Brochures.co.uk

Read More..

The Star45 Model Sail Boat A radio controlled R C Sailing Model

| 0 komentar |


The Star 45 is a 45" long hard chine hull; semi-scale model of the full-size Olympic Star. They weigh 12 pounds plus, have 12 inch beam. They are easy to scratch build and sail. Well suited for building by by the novice builder and by the skipper looking for a classic looking model to race.
Read More..