Tampilkan postingan dengan label star45. Tampilkan semua postingan

Sailing Model AMYA Star45 Class Construction Deck s Hatches

| 0 komentar |

from John Fisher:
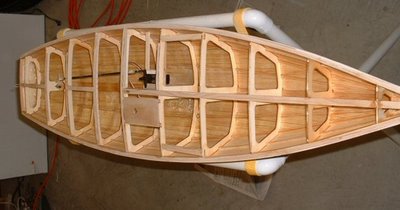
Attaching deck to hull
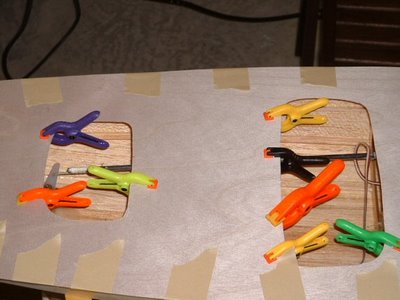
John Fisher photographer


Hull with deck mounted:
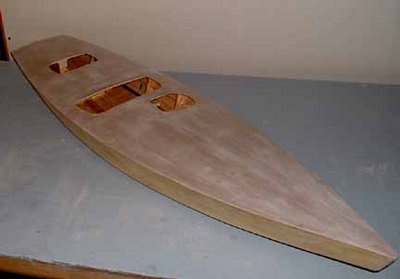
John Fisher photographer


--------------------

HATCHES:

From Phil Geren:
The simplest hatch cover solution I have found for Star 45 is to cut a piece out of Presentation Cover vinyl, which cut-out is shaped like the hatch opening but 1/4 or 3/8 of an inch larger on all sides. Then, apply electricians tape (1/2 or 3/4" wide) all around the perifery, so that half the tape is on the vinyl and half is hanging over the edge.

Presentation Cover vinyl which I get at Office Depot is about 15 cents a sheet; it is about 0.008" thick; it is slightly over 8.5X11" in size; a full sheet weighs about 16 grams; it is stiff, but flexible; it is crystal clear, but if you want it opaque, just wet sand it with #400 grit wet or dry sandpaper.

Position the hatch cover over the hatch so that the tape extends evenly past the hatch opening an equal distance all around, and then just press on the tape to stick it to the deck. Its waterproof, durable.

You can make spares and stick them to another piece of vinyl and carry that with you to the races. That keeps spares nice and flat and keeps the tapes sticky side clean for future use. A set of these hatch covers usually lasts me all season. At lunch, I take one cover off to allow the boat to dry out, sticking the cover to a dry vinyl sheet to keep the tapes sticky side clean.

Photo is Star 45 #778, freshly rebuilt for the Nationals this year, and a set of covers on the floor next to her.
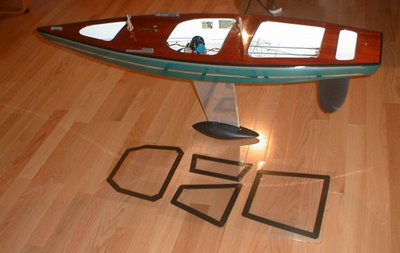


Phil Geren photographer


--
from Uncle Dave:
I pulled one of my old Star45s from the attic and have it here in my workshop. It has a fiberglass Sirius 45 hull, a aircraft ply deck and aluminum keel fin. Unfortunately it is not one of my finest examples of workmanship or painting. However Ill suffer the embarrassment and use if to show some one style of hatch construction.

Carrying around a model around out of the water is no big deal. Taking a model out of the water can be something else. You first need to hang onto the model. Then find a place to take hold to lift the model. This is one of the reasons I have used easily removable hatches. You can grab the model through the hatch, fingers under the deck and pick it up. Of course a thin ply deck the model deck and hatch construction needs to be strong enough to withstand pulling on the deck and lifting a twelve pound plus model. Therefore I braced my decks around hatch areas.

First I built a flanged frame for the hatch to sit in that also extended under the deck and attached to the deck bracing.
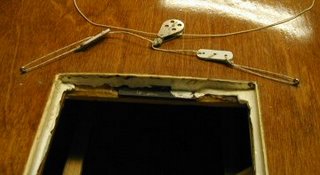
dlm_hatch_a.jpg

Then I built a hatch cover based on the size of the hatch. Initially the hatch cover was made to fit very loosely in the hatch. I then took some silicone (tub seal or similar) squeezed a bead around the shelf/lip of the hatch. The covering the hatch opening with food wrap poly sheeting Id push the hatch cover in place down into the silicone. This made a nice water tight gasket around the edge of the hatch. After waiting a day Id remove the plastic, trim and silicone that showed topside. With the silicone dry, pop the hatch cover in place and check the fit.
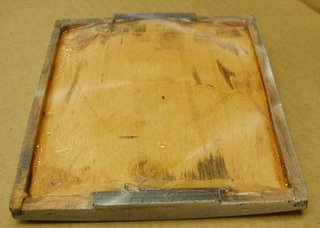
dlm_hatch_b.jpg

I placed a strip of magnetic tape on either end of the cover and on each end of the hatch frame.
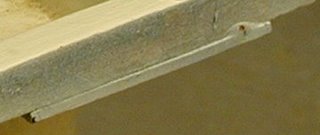
dlm_hatch_c.jpg

When the hatch cover and hatch mag tapes touched they pulled together. This magnetic tape is neat stuff you can pop the cover in place and it will stay put.

Typically I made my hatches about 4"X5" giving me plenty of deck to the sheer.
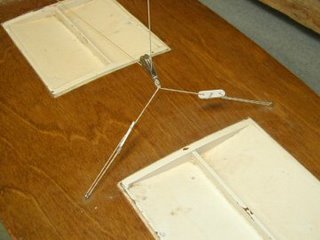
fixed_travelersml.jpg

I heavy weather if the model might go over on beams end Id cover the seams with tape just to be extra watertight. A 4X5 hatch gives room to get inside, adjust winch, radio etc, and to remove any water that got into the bilge while sailing.

Read More..

Star45 What is a hull Daves construction categories unofficial

| 0 komentar |
Model Sail Boat Building, How To Build A Wooden Star45 R/C Sailing Model: What is a hull ? and construction categories
A composite hull:
a hull constructed of wood and covered with reinforced plastic (cloth impregnated with resin).

OR:
a hull constructed using a laminate (sandwich) consisting of reinforced plastic (cloth impregnated with resin) on two sides of a core . Core materials may be foam or wood.
Read More..

Sailing Model AMYA Star45 Class keel mount using keel trunk

| 0 komentar |

Here is how John Fisher built two Star45 keel trunks. First he make a aluminum mandrel that is the same size and shape of the top of his keels. Next he waxed the aluminum and then put a single layer of wax paper over the mandrel.

He used a light spray of 3M 77 to stick the ends together on the second one. The first one had a pc of tape, which is now a part of the trunk.

The mandrel with waxed paper is wrapped with glass which he again used 3M 77 to hold in place. He has not verified that this doesnt have any long term effects to the glass so use at your own risk. John used 2 layers 3.2 oz glass with glass tape on the top and bottom edges to help add some stregth. Usually he would add kevlar, but that is not allowed in the stars. One the glass was in place John wet the whole thing with resin. If you dont have any way to vac bag the trunk, just let it cure and remove the mandrel. The trunk weighted in at 1 oz.

John has a food vacuum sealer so he put a release paper over the top (wax paper with holes in it), then breather cloth (he hasused paper towels in the past), and then into a food saver bag for the night.

To remove the mandrel he used a hammer and a vice. He knows that sounds severe, but that is what it took to get the mandrel back out. He started by placing the mandrel into a vice with smooth jaws. The jaws were just far enough apart that the aluminum would fit between them, but not the fiber glass wrap. Then he tapped the mandrel out. He points out how much force it took for him to get this apart so you can design your keel top with this in mind.

Photo 01- mandrel before prep
Photo 03 -mandrel with glass, ready for resin
Photo 04-keel trunk in food saver bag. You can see the resin going into the breather cloth.
Photo 05 - keel trunk off the mandrel, note the tape. 2nd trunk used3M 77 instead.
Photo 06 - Trunk on the keel.


The following picture shows the way that John aligned the keel on his second boat.
Since the keel is plate and 1/8" thick I laid a straight edge on it and
aligned it with the pc at the center of the transom. I did this on both
sides to make sure it is centered as well.

To capture the top of the keel box he added 2 1/8" X 3/8" spruce blocks
to the top of the keel trunk and glued them to the king plank. The photo also shows the glass tape He used to reinforce the
radio tray.


John Fisher photographer


===

here is an alternative keel trunk (from Uncle Dave)

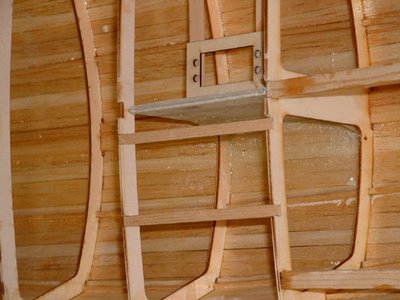
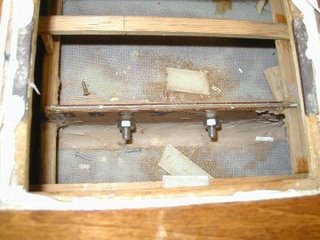
I poked my camera down into the Sirius 45 and snapped a couple of pictures showing how the keel is attached to allow it to be removed and another installed.

The keel is a aluminum fin with my flat bottomed bulb. The keel trunk is assembled over the keel fin before mounting the trunk in the hull. The trunk is pretty simple. Two pieces of 1/8 ply on either side of the fin. Cut flush across the top of the fin. Height is determined by the amount of the fin to extend into the hull. Length is determined by the shadows or braces to support the fin. A filler pieced goes between the sides so that fin can be slid own and out of the trunk.

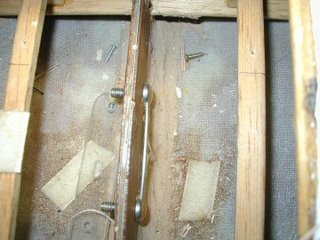
Before gluing the trunk up it is very important to coat the insides of the trunk to make the sides of the trunk as water resistant as you can. The the fun part is placing two mounting bolts through the sides of the trunk and thought the keel fin. I think the two bolts in the picture were 1/2 long 3/8 inch dia.

DLM_s45_trunk_a.jpg

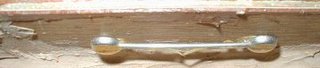
I placed a heavy wire through the both the bolt heads so I could turn the nuts on the other side.

DLM_s45_trunk_b.jpg

With the nuts removed the two bolts simply push to one side and the keel fin mounted or removed as the case may be. In my models the height of the fin inside the model is low enough for a swing arm sail control to fit properly. I use Probar (now Dumas) SCUs.

Before building the deck I simply dropped the trunk (with keel fin) through the slot in the bottom of the hull so the trunk rests on the keelson. The hull being fiberglass the trunk if filleted with the bottom using some auto body resin-paste. I think I also used the resin paste to mount the keel trunk in my wooden models (memory escapes me its been years). The ends of the trunk are braced to the chine to with stand leverage forces from the heavy keel bulb and sailing stresses.

DLM_s45_trunk_d.jpg

When the two bolts are tightened they not only hold the keel in place they also pull the sides of the of the trunk tightly together. With the tight fit one should expect the keel fin may stick in the trunk if some sort of lubricant (silicone) isnt used.

Read More..

Sailing Model AMYA Star45 Class building rudder

| 0 komentar |

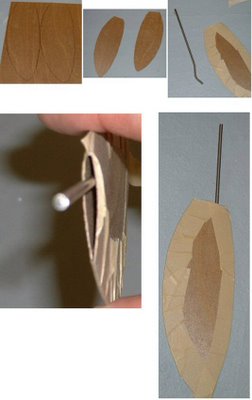
Here are some photos showing one way to build a rudder quickly and easily. The quick overview is cut out the shape in a thin material, tape the sides together, insert the rudder shaft, fill the inside of the rudder with epoxy. This takes about 10 min or so to do. Followed by installation in your boat.

John Fisher

Lay out the rudder shape on a sheet of 1/64 ply. On other class boats John used a single layer of a 6 oz carbon fiber layup, so you could also lay up some fiberglass for use on the star. To do a glass layup, just take a sheet of 6 oz or heavier fiberglass, a sheet of lexan or plexiglass, and some resin. The first step is to spread resin on the plexiglass, then apply the fiberglass and then make sure it is all wetted out. Once cure flex the plexiglass and the layup will pop off.

Shows the two sides cut out of plywood, these could be fiberglass instead. Straight sided shapes like shown and the star plans are easier to make.

Tape the two sides together with masking tape. With curved shapes He taped them together then insert the shaft and resin. If you use straight sides on the rudder you can tape one side and then open it up like a book, apply resin, then close and tape shut. The open book method uses less resin but only works with sq or straight sided shapes.

Note the bend John put in the shaft to prevent it from turning inside the rudder.

Shows the top open to pour in resin. John uses a syringe to pour in resin once the shaft is in place. You can add micro balloons to the resin if concerned about weight.


Installing Rudder in Star 45

rudder brace

rudder tube


tiller

rudder link

John Fisher photographer

Read More..

The Star45 Model Sail Boat A radio controlled R C Sailing Model

| 0 komentar |


The Star 45 is a 45" long hard chine hull; semi-scale model of the full-size Olympic Star. They weigh 12 pounds plus, have 12 inch beam. They are easy to scratch build and sail. Well suited for building by by the novice builder and by the skipper looking for a classic looking model to race.
Read More..

Sailing Model AMYA Star45 Class Planking bottom of hull

| 0 komentar |
From John Fisher:

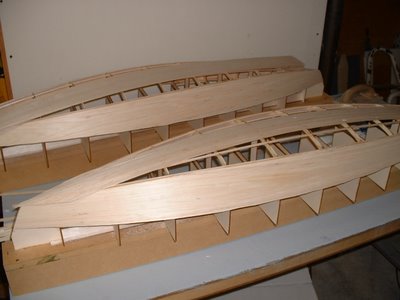
Photograph by John Fisher


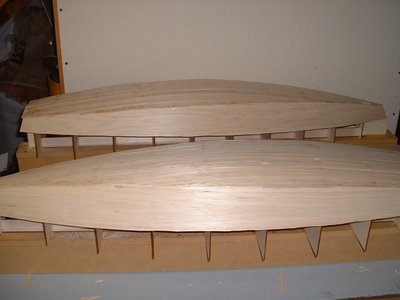
Photograph by John Fisher


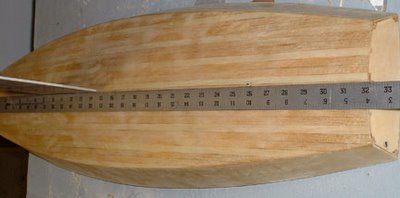
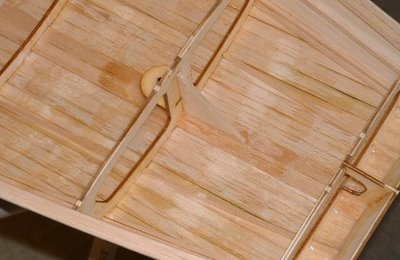
Since it was requested here are a couple of photos of planking the
bottom of my two wood/glass stars. photo 01 is the bottom of the first
star about half way done. Planks are 1/16 X 3/8 balsa. These were cut
from a 48" long sheet. Weigh your balsa before buying it. I would not
use a 3 X 48 sheet that weighed in at more than 22g. It takes 3 sheets
to cover the bottom and you could add another 1 to 1.5 oz by using
heavy balsa.

I started in the middle and worked to the outside. I sprayed the
shadows with kicker, then put down a plank, then added super fast CA to
hold it down. If the kicker was not dry enough it would cure before it
wicked into the joint which would cause the next plank to not fit
correctly. I had some variation in the planks, but once they were
glassed the bottom smoothed out quite a bit.

If I were to do another one I would add the half frames. I will be
adding them to the DXF files in the next couple of days for anyone
wishing to cut a set.

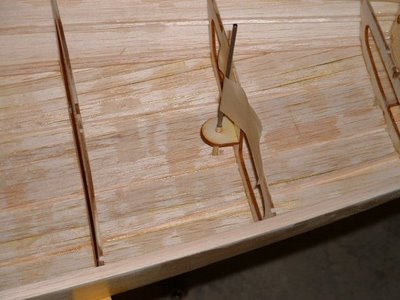
Picture shows the bottom after it was completely planked. On the
second boat I got a nice pattern on the bottom since the balsa sheets
had different grain structure. I sanded the sided flush and got the
bottom relatively smooth, but not perfect. With the balsa planks they
were flexible and if sanded too much you get thin spots at the frames.
The glass smoothed out inperfections. If doing a hard wood bottom the
planks should fit better than what I did with the balsa.

John Fisher 2006 August 15

Read More..

Sailing Model AMYA Star45 Class Decking

| 0 komentar |

From Terry Forbes:
"The Star 45 boats that I have built have decks made from bass wood strips that are 1/4" X 1/16". I find them easy to use and easy to bend with out fracturing. I use thick ca to bond to hull frames and to the adjoining strip. When is have it all glued down, I sand with 120 grit and then 200. I use a soft rag to wipe off deck but leave the cracks filled with the sanding dust or "wood Flower" I then give it a thinned coat of slow cure epoxy. This first coat will soak into the wood completely. I then use un-thinned epoxy for the second and third coat, wet sanding and tack ragging between coats. If you want a really glassy deck, I use a finish coat of Captians Spar varnish. I have used this finish technique on full scale boats and all of my Kayaks. Very nice and durable finish. The decks go on easy and I try to stagger the strips one dark one light. I built a full scale star in the early 60s and had a striped planked deck. I like the look and it builds light. It keeps the hull true as sometimes when you add the deck using plywood it can cause it to move around. I will post some photos of my next hull as it comes to life. I have constructed a ships-way. I used the formers that are shown on the IMYA star plans. I now only have to cut the actual hull formers. I Stack cut 4 at a time on my trusty Dremmel Moto Shop Saw. I have added some lighting holes here and there. All in all I can have a hull lofted in 1 hr. and the sides on that evening using 20-min epoxy to coat the frames and the inside of the hull side. I first made my side peaces out of poster board. This allowed me to get the fit close and have a template to trace the sides for cutting. "

Read More..

Covering Star45 model hull with fiberglass and epoxy resin

| 0 komentar |
From: "John Fisher" racer577 at citystar.com
I have used the 3.2 oz satin weave on 7 boats now. The first was a single layer and now that hull is 4 or 5 years olds it is showing wear and tear. I went to using 2 layers to help with durability and to have more material for sanding. Another thing I like about the cloth is that is drapes very nicely and easily will cover the hull with one pc. On my 10Rs I have used 2 yards folded in half to do the hull. On the star I was concerned that it would be too wide for a single yard. I ended up with more than enough material so I cut it on the diagonal.

The glassing starts by laying the glass over the hull. Then I smooth it out so there are no wrinkles. This may take a couple of min. Then I repeat with the next layer. Once the glass is smooth, time for epoxy. I used the 209/105 west systems combination. I used about 10 pumps of material.

I start applying resin to the middle of the bottom with a cheap paint brush. Then I work my way out to the edges of the bottom. Next I do the sides. You need to use lots of resin and dont pull too much or you will pucker the cloth. Once everything is wetted out I go back with a squigee and remove the excess resin. Dont get to carried away or the cloth will go dry again. If in doubt of how this should look practice on a spare block of wood first to get a feel for how the cloth looks as you take out resin.

I did the glassing at about 8 pm and with the 105/209 the resin is still green at 7 am the next morning. When green the glass can be trimmed with a #11 blade in a hobby knife. Then wait another day or two until sanding for full cure. I dont like to do much sanding, instead I try and do most of my fairing by using a thick primer and sanding most of it off between coats. For a clear boat I use polyurethane for a top coat.
Read More..

Wood choices and AMYA rules for Star45 Class

| 0 komentar |
Hulls may be planked using any number of types of wood, including thin aircraft plywood, cedar, balsa, etc.

The Star 45 is a terrific boat for sport sailing and family fun. If you want to race other Star 45s you should build to the AMYA Class rules.

Here are key 2006 AMYA Star 45 Class Rules,section 1.0 Hull:

1.1 The Star 45 Class establishes as their approved plans a set of lines and drawings as the approved reference and construction plans for the class. These plans are scaled and appropriately modified for the use of modelers building a 45-inch model of the Star Boat. Existing plans supplied by kit manufacturers, etc. are grandfathered. New molds, plugs and scratch built models shall conform to the approved plans and specifications.

1.2 Hull length will be 45 inches (plus or minus one half (1/2) inch overall. (NOTE: this does not include any chain plate for backstay attachment, or 1/4 inch bow bumper if used. However, if the chain plate is attached to the transom or overhangs the transom, it may not extend beyond the transom more than 3/8 of a inch.) Hulls may not be less than 11 inches nor exceed 12 inches in beam when measured at the widest point on the deck. (Rubrails are not included in measuring but will not exceed 1/4 inch of thickness/width.)

1.3 In the event of a builder choosing to scratch or hand build a Star 45 Yacht, the builder must adhere to the class approved reference and construction drawings, as obtained from the AMYA Ships Store, as in the builders ability. A second consideration in scratch building is to ensure that safe and sound building practice be maintained.

1.4 All hulls will be constructed of wood or fiberglass or a combination of wood and fiberglass and be a minimum of 16 ounces when weighed before attachment of the deck and keel. This weight must be verified by another member of the Star 45 Class using the Class Measurement Form.

1.5 Decks shall be constructed of wood, fiberglass or plastic laminate material.

1.6 All hulls shall be the standard hard-chine hull. Hulls may be built with a sheer at scale height or with a sheer no more than one inch higher than scale (when measured at the point of maximum depth of sheer.)

1.7 All fiberglass and wood hulls will have a name plate permanently attached to the inside of the hull so as to be seen when the hatch cover is removed.

1.8 At or before its first Sanctioned Regatta the newly built model yacht must be measured using, as reference, the approved measurement form and signed by not less than the owner of the model yacht and one other member of the class. This measurement form shall become, with the registration card, a permanent record of this model yacht.

1.9 The AMYA Star 45 Class recognizes and approves the molds and manufacturer and/or kit packagers of Star 45 molded hulls and kits in existence at the time of approval of these specifications. These sources will be approved sources for the class. New manufacturers will be directed to submit the first of their product to the Class Secretary for approval.

1.10 No maximum weight is specified, however, no yacht will weigh less than 12 pounds when fully rigged ready to sail. This means with all gear, rigging, sails, radio components, batteries and ballast placed and secured on board.

1.11 Bow Bumpers are mandatory for all class registered STAR 45 yachts. Bow bumpers are limited to three eights of an inch (3/8") overhang. Bow bumpers shall be excluded in the overall length measurement, whether recessed in or otherwise attached to the bow stem. Bow bumpers must be of resilient fabrication to minimize damage to another yacht in the event of a collision.
Read More..