Tampilkan postingan dengan label from. Tampilkan semua postingan

S45 Rigging Bill of Material from John Fisher

| 0 komentar |
Building Displaying Sailing
Model Boats and Ships
S45 sail boat Rigging Bill of Material from John Fisher
To:Star45@yahoogroups.com
From: J Fisherjfisher@wildblue.net
Sender: Star45@yahoogroups.com
Date: Wed, 3 Jan 2007 21:02:38 -0700 (Mountain Standard Time)
Subject: Re: [Star45] Deck rigging and such

Here is the list on the star 45 yahoo groups for rigging. I am using the following for my next couple of builds:
GBMY item #, description, qty, purpose
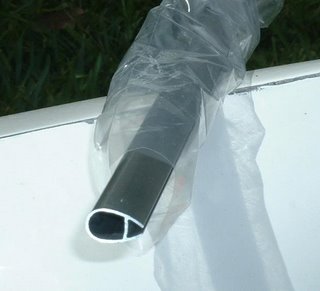
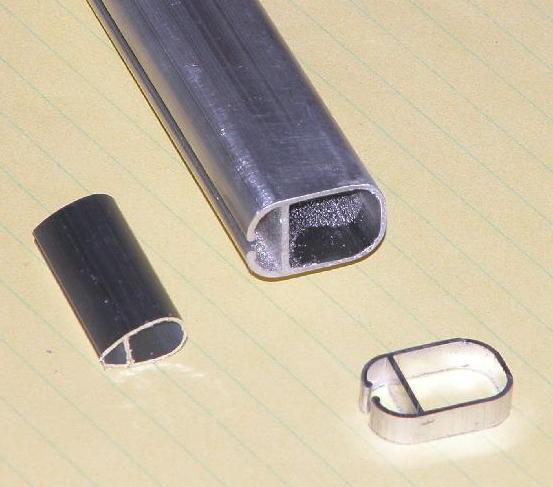
019, 3/8 alloy tube, 1, Jib boom
034, Hales single block, 2, main and jib sheets
146, tapered drain plug, 1, plug in transom
182, Z sheet hook, 2, sheet ends/boom attachment
202, large bowsie, 1, back stay/forestay with 80 lb Dacron, order small ones if using spektra
206, O-rings, 1, hold the Z hooks to the boom.
254, double block, 2, main sheet and jib sheet adjuster
255, sheet exit, 1, turning block for main sheet from under deck to above deck.
269, eye plate, 1, mounting for jib block.
272, 180 deg sheet lead, 1, turn around for jib tweaker
280, sheet hook, 1, hooks for backstay and fore stay.
282, tang, 1, attach lowers to mast.
907, rigging screw, 4 hooks, 2 packs, upper and lowers to the deck.

I also build my own chain plates, so I dont order them from GBMY. Don does carry them if you need them. I also like the Ludwig mast better than the bantock mast, so I ordered 8 foot masts cut to 69 from Larry Ludwig, the other 28 or so is the main boom. Last time I made all my own boom vang, mast fitting. This time I ordered them from Larry. You can use the bantock mast, boom, and fittings from GBMY as well. They are good stuff and I have them on my IOM.

The back stay crane is made from 1/16 (.063) aluminum that I bought at the local hobby shop.
John Fisher
---
photos courtesy of "Larry Ludwig" at www.LudwigRCYachts.com, Ludwig Mfg.
Read More..

Rig 6 from 100 Small Boat Rigs 103 Sailing Rigs

| 0 komentar |
One of my boys built himself a lapstrake (clinker) dinghy. At the time, we were working very long hours in the Brisbane workshop and I couldnt give him much of my time to help. But, he was surrounded by timber, glue, and tools, and with space in one corner and a ready-built strong-back he was on his way.

The boat turned out very well indeed, especially as the builder was only fourteen years old.

The owner-builder (Dave, in white) with Cousin Kevin lending a helping hand.
Hull nearing completion
After the building process, Dave was keen to get on the water, and he decided to purchase a carbon windsurfer mast to speed the launching, and a friend gave him an old Laser sail, which happened to be the same size as the designed sail.

Builder, carbon windsurfer mast, and Laser sail
The boat sailed reasonably well with the windsurfer mast, but it was too flexible down low and when sheeted on, the whole rig bent aft inducing weatherhelm and other handling problems - still it was fun.

Sailing nicely in light conditions...

...but in the gusts and sheeted hard, the rig bends aft, and you can see that the boat is becoming difficult to control
Eventually, Dave stashed away enough money to get the proper sail made. It had a fair amount of roach and leech battens which were too short. The leech would not stand as the flexible mast bent back, and it flapped uselessly. I dont have a photo to hand, but below is one of a boat we built earlier to the same design. This one had a nice, hollow timber mast which I made using the "Birds Mouth" method. Although a lot stiffer than the windsurfer mast, the leech problem is still evident.

Stiff mast on an earlier boat, but still having problems with the floppy leech
We decided to do something drastic, so we cut the roach off Daves new sail, removed the battens, and sewed on a new leech tabling (hem, I guess you would call it). This improved the set of the sail, as I had put a slight hollow in the leech and it worked well without battens. But the mast was still too whippy.

The final stage was to install a forestay and two shrouds (side stays). In order to retain the sail-shaping advantages of the bendy mast, we attached the stays at a point only a fraction above the half-height point on the mast (as per Rig 6 in Phil Bolgers book, "100 Small Boat Rigs", which is now published as "103 Sailing Rigs").

The improvement has been astounding. The handling issues have been resolved, and with the mast held at the half-height position, all sorts of sail shaping options are available by using the main sheet, the vang, the halyard, and the outhaul. We made the stays from 4mm Dyneema without an outer sheath as an experiment, and it has worked very well indeed. I couldnt work out the correct method for splicing the braided Dyneema core, so we ended up just doing plain bowline knots around the stainless thimbles - not very neat, but they work fine. I dont have sailing photos, but here is the boat on dry land as we set up the stays.

Stays attached halfway up the mast
Simple lashings
Mast far better controlled, and showing a little 11sq.ft. Heron jib set as well. The original boat carried quite a lot of weather helm and the jib helps to balance that out.
Sail plan in cat-rig form. The alloy sleeve around the lower part of the mast was an earlier attempt to stiffen things up.
All of this shows how much fun you can have messing around with rigs and layouts. A great source of satisfaction.
Read More..

More Interesting Work from the Workshop circa 2004

| 0 komentar |
Around 2004 we were building at least six boats at one time in the old workshop - with only three-and-a-half people on the job. It was a hectic time, and looking back on it, we did some creative stuff. At one point a customer decided that his outboard-powered boat (a Phil Bolger Hope which we were building with a lapstrake hull and a small cuddy cabin) would be better as a diesel in-board, even though she was nearly finished in the outboard configuration.. I quickly designed an inovative skeg arrangement, and we carried out substantial structural modifications to accept the Yanmar 1GM10 deisel.

The nature of the retro-fitted keel/skeg was such that I thought it needed extra support against side loads and so I made a pattern for a cast bronze propeller shaft strut which had an inverted "V" on the upper side of the bearing. Not an original thought, but my first attempt at pattern making, which had been made necessary by the extreme urgency of the situation. The foundryman was a marine specialist (Marine Castings and Manufacturing - still in business) and was (to my surprise) happy with the pattern. Not only did he cast the prop strut, but he cast and machined the propeller, and the water-injected dripless-seal. Everything worked!

Propeller and strut, loose fitted without the proper pads etc - but still looking good

12" x 10" propeller from memory.
Custom-made dripless-seal
Boat on launching night - secret launching before the official one to come the next day!
??
Me, looking very relieved after the owner had gone home from the secret launching. Now I could get back to business on the details (and have a quiet beer, I think)
??
Launching Day (Official) for the in-board boat
??
The outboard boat awaiting the owners arrival for the final inspection.
??
?
Read More..

RE slots in laser cut frames and stringer from old forum notes 8 31 2010

| 0 komentar |
Ray wrote: >
need to know what are the vertical > slot in frames 4,5,and 6 for also what size stringer goes into frames right > at the bottom where the bottom of hull meets the side of the boat also there > seems too be a slot for another brace on frames 4,5,and 6 directly under the > vertical slots.
Thanks Ray from Down Under

the vertical slots are for the radio tray if you use it. the extra vertical slots by the king plank are just extra strength for the keel area. Chines are 1/4" X 1/4" or 6.4mm sq.

John On 8/30/10,
Read More..

Up Date Rig 6 from 100 Small Boat Rigs 103 Sailing Rigs

| 0 komentar |
UP_DATE

Back in early April I wrote an entry about the above rig. You can find the article here http://rosslillistonewoodenboat.blogspot.com/2011/04/rig-6-from-100-small-boat-rigs-103.html

At the time I wrote the piece I didnt have any sailing pictures showing the modified rig in action. Now I can show you a couple. They are low-resolution, but they give a good idea of how much the rig has been improved.

The mast used to bend back alarmingly when sheet and vang were tensioned - now everything stays where it should be and the boats behaviour has been improved dramatically.
Setting out for a day of pleasant sailing with a vastly improved rig
Read More..